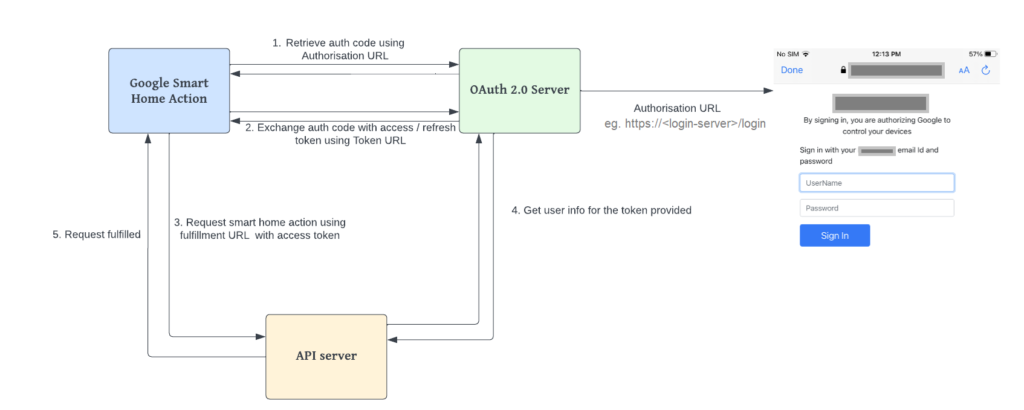
How do you integrate the Google Smart Home API with your IoT devices?

Niharika Argade
Niharika Argade
MTS, Nuro Technologies

Smart homes that are providing homeowners with comfort and convenience at their fingertips have now become prevalent. Google provides their own service to unite all these smart devices through one app called Google Home. This can be done by integrating your IoT devices with the Google Smart Home API. Let’s get started with the integration process.

Google Home Integration for IoT devices

To begin, we need to make sure your server has OAuth implemented for linking the accounts.  To operate IoT devices through a server, Google expects a token to be added to the API header to authenticate the transaction. Google works with an Authentication URL to obtain an authorization code and a Token URL to obtain and refresh the API token. Google highly recommends using opaque symmetric encrypted access token as it can only be decoded by an authorization server unlike JWT tokens that consist of user information.

Google Home Integration Architecture

Before we get more into the technical aspect of it you need to understand certain nomenclature used by Google to communicate with your server. Each device has a device type and traits. 

Type tells Google the kind of device it is working with; for example Light, Switch, Camera, etc.

Traits are the capabilities of a device; for example Brightness, OnOff, LightEffects, etc. Traits have properties that are :

  1. Attributes – device information that is static for example mode or temperature units

  2. Stategives information about the state of the device for example if a light is on or off; or the brightness of light.

  3. Labelit is used to identify the device or a device name; for example Room lights.

You can go examine all device types  and device traits supported by Google.

Create a Google Home Action 

Actions is a platform for developers to integrate with Google Assistant. 

Go to your Google Actions console and create a new project.

Google Actions Developer Console
Google Action Create Project
Create Google Action Project

Select the kind of action you want to build. In this case it would be Smart Home and Press on Start building. 

Google Assistant- Type of Action

You can open your project from the list and then go through the quick setup. 

Google Assistant Setup

Give an invocation name which will be used by users to interact with it by typing or speaking. 

Google Assistant App Name

Configure the Action with the fulfillment URL which is the endpoint google will use to communicate with your server.

Google Assistant Fulfillment URL

Configure Account linking by adding client id, client secret, Authorisation URL and Token URL. These endpoints will be used by Google to authenticate users using OAuth.

Google Assistant - Client Information

Intent fulfillment

Google will use the fulfillment URL mentioned in Actions to communicate with the server and resolve Intents. Intents are tasks by actions that need to be performed. 

We need to handle 3 types of intents : 

SYNC 

It fetches all the device details for a user. It has all the devices type their traits, attributes and meta-data related to the device. Meta-data can have device name and id. Here is an example of SYNC response that is expected from your server:

				
					{
  "payload": {
    "agentUserId": "user@email.com",
    "devices": [
      {
        "traits": [
          "action.devices.traits.OnOff",
          "action.devices.traits.Brightness"
        ],
        "willReportState": true,
        "name": {
          "defaultNames": [
            "Room Light"
          ],
          "name": "Room Light",
          "nicknames": [
            "Room Light"
          ]
        },
        "attributes": null,
        "id": "mac",
        "type": "action.devices.types.LIGHT"
      }
    ]
  },
  "requestId": "123ABC"
}


QUERY


It reports the current state of one or more devices whose IDs are mentioned in the request. These device IDs are provided by your SYNC response. For example if you want to get the connected state or brightness of one or more devices. Here is an example of QUERY response that is expected from your server.

				
					{
  "payload": {
    "devices": {
      "mac": {
        "brightness": 0,
        "online": true,
        "on": false
      }
    }
  },
  "requestId": "123ABC"
}


 EXECUTE


It is used to send commands to one or a group of devices. For example, to change the brightness of lights to a certain level. Your response to the EXECUTE request must also contain the new state of the device after the execution of the command. Here is an example of EXECUTE response that is expected from your server: 

				
					{
  "payload": {
    "commands": [
      {
        "ids": [
          "mac"
        ],
        "status": "SUCCESS",
        "states": {
          "brightness": 75,
          "online": true,
          "on": true
        }
      }
    ]
  },
  "requestId": "123ABC"
}


Both responses for QUERY and EXECUTE can have a status field which can be one of the following values : SUCCESS, OFFLINE, EXCEPTIONS, ERROR.

Besides these requests, you need to also provide the device’s state by calling Report State API whenever devices are updated, added or removed. This call is made to Home Graph to update Google Home with the latest device data. To make a Report State API call you need to first enable Home Graph API and generate a Google Service account key to authenticate the call to Home Graph. Your server can make a POST request to the endpoint: https://homegraph.googleapis.com/v1/devices:requestSync?key=API_KEY

				
					{
  "requestId": "123ABC",
  "agentUserId": "user-123",
  "payload": {
    "devices": {
      "states": {
        "mac": {
          "on": true
        }
      }
    }
  }
}


Test and Deploy Google Home Action

Once Google Action is set up, you can check the integration with Google Assistant or a simulator provided by Google.

Google Assistant simulator

To deploy your Google Action you need to pass the test cases in test suite.

Google Assistant Test Suite

In the deploy section, you can go ahead and fill product, company details and apply for smart home certification by filling and submitting a form.

Google Assistant Deployment

Finally, you can go ahead and make your Google Action available to the public by releasing it in production and this completes your integration of Google Home with your IoT devices

Leave a Reply

Your email address will not be published. Required fields are marked *

This website uses cookies to ensure you get the best experience on our website.